Halloween Oreo Balls Recipe: Easy No-Bake Treats
Ever thought a simple cookie could turn into a fun Halloween treat? Halloween Oreo Balls are the answer. They mix Oreos with creamy goodness. These no-bake treats are super easy to make, perfect for any party.
With just a few ingredients, you can make these Oreo desserts. They look great and taste amazing. It’s time to add some spooky fun to your kitchen!
Introduction to Halloween Oreo Balls
Halloween Oreo Balls are a fun twist on festive treats. They mix Oreos and cream cheese into a tasty delight. These spooky treats are easy to make and loved at Halloween parties.
They come in bright colors and fun shapes. This makes them a hit with both kids and adults. You can get creative with shapes like pumpkins and ghosts.
When making these treats, let your imagination run wild. You can make them round or go for spooky shapes. With just a few ingredients, you can create these treats and share the Halloween spirit with others.

Essential Ingredients for Halloween Oreo Balls
Making the perfect Halloween Oreo Balls starts with the right ingredients. Each part is key to the flavor and texture. Let’s look at what makes these treats so special.
Oreos: The Star of the Recipe
Oreos are the heart of this recipe. Their chocolate taste and crunchy texture are perfect together. You can use classic Oreos or Golden Oreos for a lighter taste.
Cream Cheese: The Perfect Binding Agent
Cream cheese is great for holding the Oreo Balls together. It mixes well with crushed Oreos, making a smooth mix. Full-fat cream cheese adds a richer flavor.
Coating Options: Chocolate and Beyond
Choosing a chocolate coating is the final step. Milk chocolate and white chocolate are favorites, but candy melts add a fun Halloween touch. Try different toppings like sprinkles to make them look great.
| Ingredient | Role | Notes |
|---|---|---|
| Oreos | Cookie Base | Classic or Golden variety |
| Cream Cheese | Binding Agent | Full-fat for best flavor |
| Chocolate Coating | Outer Layer | Multiple options available |
| Candy Melts | Decorative Coating | Colorful for various themes |
| Dessert Toppings | Finishing Touches | Sprinkles, drizzles, etc. |
Step-by-Step Instructions to Make Halloween Oreo Balls
Making Halloween Oreo balls is fun and easy. It involves several steps to get the perfect treat. Follow these steps for a delightful no-bake dessert that everyone will love.
Grinding the Oreos
Start by grinding the Oreos in a food processor. This step is key to turning the cookies into fine crumbs. If you don’t have a food processor, place the Oreos in a zip-top bag. Then, crush them with a rolling pin until they’re crumbly.
Mixing in the Cream Cheese
Now, mix the crushed Oreos with softened cream cheese in a bowl. Stir until the mixture is creamy and even. This makes the mixture easier to work with as you prepare your treats.
Shaping the Balls
After mixing well, start forming the Oreo balls. Take small portions and roll them into uniform balls. Aim for a consistent size for even coating later. This step is important for both looks and taste, as uniform balls look great.
Chilling Time: Why It’s Important
After shaping, put the Oreo balls in the fridge to chill. Chilling is crucial for setting their shape and enhancing flavors. Let them chill for at least 30 minutes. This step solidifies the mixture, making them hold up well during coating and serving.
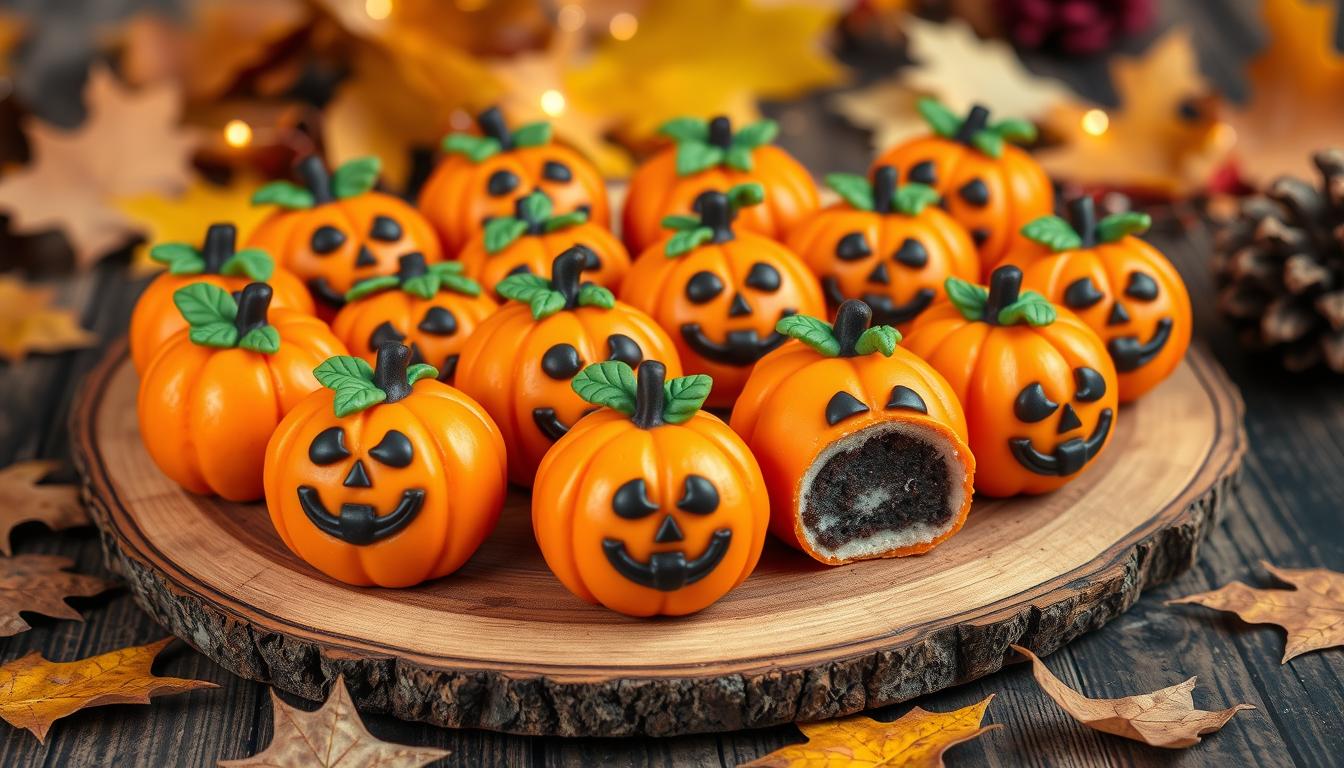
Creating Round Pumpkin Shapes
Turning your Halloween Oreo balls into festive pumpkin shapes makes them look great. It also fits perfectly with Halloween decoration themes. Getting the right pumpkin shape is simple. Just follow these easy tips to make your treats fun.
Transforming Oreo Balls into Pumpkins
Begin by shaping your chilled Oreo balls into round pumpkin shapes. Roll each ball gently between your palms for a smooth surface. This step is key for a nice round shape that looks great.
Remember, these pumpkin shapes will be the base for your decorating fun.
Decorating with Green Icing and Pretzel Stems
Then, use green icing to make pumpkin leaves. Spread the icing around the top of the pumpkin for a natural look. Use pretzel decorations for the stems to add texture and color.
These details make your pumpkins look like real jack-o-lanterns.
Adding Jack-o-Lantern Faces with Dark Icing
Finally, use dark icing to add fun faces to your pumpkins. Use icing tips to draw different expressions. Making your Halloween designs unique adds fun to your celebration.

Making Mound-Shaped Ghosts
Creating adorable mound-shaped ghost shapes adds a delightful twist to your Halloween dessert table. These spook-tacular treats require just a few steps. You’ll shape the Oreo mixture and finish with a glossy white chocolate coating. Perfect for festive baking, these ghost decorations will surely impress your guests.
Shaping the Ghosts with Oreo Mixture
Start by rolling the prepared Oreo and cream cheese mixture into small mounds. Aim for a height that provides a ghostly appearance. Keep the base slightly wider for stability. This balance is key for achieving the perfect ghost shape. After forming the mounds, chill them for about 30 minutes to set.
Dressing Up with White Chocolate Coating
Once chilled, it’s time to dress up your ghost shapes. Melt white chocolate until smooth and dip each ghost into the warm coating. Ensure each treat is fully covered for the best visual effect. This creates a bright contrast against the dark Oreo mixture.
Allow the excess chocolate to drip off before placing the ghosts onto a parchment-lined tray. This extra layer not only enhances the appearance but adds a wonderful flavor. It pairs nicely with your Halloween dessert.

Storage Tips for Your Halloween Oreo Balls
Proper storage keeps your Halloween Oreo Balls tasting great and feeling right. Follow these refrigeration tips to keep them fresh. This way, they’re always ready when you want them.
Best Practices for Refrigeration
Use airtight containers to store treats in the fridge. This keeps them from picking up odors and keeps moisture in. Wrap each ball in plastic wrap first, then put them in the container.
Make sure your fridge is at 40°F or below. This is the best temperature for storing desserts.
How Long They Last
Halloween Oreo Balls last about 1 to 2 weeks in the fridge. Check for any changes in texture or smell to ensure freshness. Enjoy them within this time for the best taste.
Fun Variations for Your Halloween Oreo Balls
Exploring creative variations for your Halloween Oreo Balls can make your celebration even more fun. By changing colors and flavors, you can bring delightful surprises to your gatherings. These desserts are not only festive but also cater to different tastes, making them perfect for any party theme.
Playing with Colors and Flavors
Think about adding vibrant colors or unique flavors to your Halloween Oreo Balls. Use colorful candy melts for coating to make them stand out. Try flavors like pumpkin spice, mint, or caramel for a twist on the classic recipe. To wow your guests, consider:
- Using vibrant orange and black colors to enhance the Halloween themes.
- Introducing seasonal flavors such as apple pie or cinnamon.
- Incorporating fun ingredients like sprinkles or crushed candy corn for added texture.
Theme Ideas for Halloween Parties
Pair your Halloween Oreo Balls with engaging theme ideas to create an unforgettable atmosphere. Here are a few themes to consider:
- Spooky Sweets: Add ghost and spider decorations to your treats for a chilling effect.
- Monster Mash: Give each ball funny eyes and colorful frosting to capture a playful vibe.
- Harvest Festival: Utilize autumn colors and flavors to celebrate the season.
Serving Suggestions for Halloween Oreo Balls
Make your Halloween Oreo Balls stand out with creative plating. They can be the highlight of any party. Serve them on colorful platters with other Halloween snacks. Here are some tips to make your Oreo Balls look as good as they taste.
Creative Plating Ideas
Plating can be as creative as you want. Try these ideas:
- Put the Oreo Balls on a tiered cake stand for a wow factor.
- Use Halloween-themed cupcake liners for each ball.
- Add edible glitter or sprinkles for extra sparkle.
- Use orange and black platters to match the Halloween theme.
This mix of treats will not only please your guests but also make your dessert table a hit at any Halloween party.

Share the Fun: Holiday Gift Ideas
Making Halloween Oreo Balls is just the start. Sharing these treats with loved ones can make the holiday season brighter. Thoughtful packaging adds a personal touch, making the gift even more special. Here are some creative ways to make your Halloween presents both tasty and beautifully wrapped.
Packaging Your Halloween Oreo Balls
Choosing the right packaging can make your treats stand out. Consider these fun options:
- Clear cellophane bags let the Oreo balls’ decorations shine. Add themed ribbons for a nice finish.
- Decorative tins or boxes add charm and keep the treats safe. Personalize each with a fun Halloween label.
- Mini pumpkins or Halloween stickers can make your packaging even more festive.
Tips for Gifting to Friends and Family
For holiday sharing, a few extra touches can make your gifts unforgettable:
- A handwritten note can express your feelings and leave a lasting impression.
- Pair your Oreo balls with other holiday treats for a mix of flavors. This makes your gift even more exciting.
- Give your gifts in person if you can. Sharing stories and laughter makes the experience even more joyful.
Why You’ll Love Halloween Oreo Balls
Halloween Oreo Balls are a top favorite treat for any spooky celebration. They’re easy to make, even for beginners. In no time, you can create these tasty treats that mix cookies and cream perfectly.
These treats are loved by all, kids and adults. You can shape them into pumpkins or ghosts, adding a fun twist. This makes them perfect for themed parties, both delicious and visually appealing.
As Halloween nears, let’s get creative in the kitchen. Halloween Oreo Balls are not just yummy but also a fun activity for family and friends. They’re sure to make your celebrations memorable and joyful!